This howto will explain how to build and configure a home web server behind a DSL firewall.
We need a computer. I pulled a pentium 3 with a 30 GB hard drive from a local dumpster. Someone gave me an old monitor which is fine since our server will operate in text mode. I had a keyboard leftover from an earlier project. Make sure the computer has an ethernet card installed! Since this is a server you don't need a mouse and 256 MB of RAM is more than enough. No windows overhead to worry about!
I downloaded Ubuntu 7.10 server i386 from the ubuntu website. Burned it to a CD and installed it using the minimal default configuration. The installer took about 30 minutes and used about 550MB of hard drive space. The running barebones system only used about 50MB of RAM.
Next step is to fix the sources.list file. Specifically, remove the cdrom source and make sure the muliverse and universe repositories are included. I also remove the comment bloat that comes with the default ubuntu sources.list. Here is my copy:
owner@myserver:~$ less /etc/apt/sources.list
# newer versions of the distribution.

deb http://ca.archive.ubuntu.com/ubuntu/ gutsy main restricted
deb-src http://ca.archive.ubuntu.com/ubuntu/ gutsy main restricted

deb http://ca.archive.ubuntu.com/ubuntu/ gutsy-updates main restricted
deb-src http://ca.archive.ubuntu.com/ubuntu/ gutsy-updates main restricted

deb http://ca.archive.ubuntu.com/ubuntu/ gutsy universe
deb-src http://ca.archive.ubuntu.com/ubuntu/ gutsy universe
deb http://ca.archive.ubuntu.com/ubuntu/ gutsy-updates universe
deb-src http://ca.archive.ubuntu.com/ubuntu/ gutsy-updates universe

deb http://ca.archive.ubuntu.com/ubuntu/ gutsy multiverse
deb-src http://ca.archive.ubuntu.com/ubuntu/ gutsy multiverse
deb http://ca.archive.ubuntu.com/ubuntu/ gutsy-updates multiverse
deb-src http://ca.archive.ubuntu.com/ubuntu/ gutsy-updates multiverse

# deb http://ca.archive.ubuntu.com/ubuntu/ gutsy-backports main restricted universe multiverse
# deb-src http://ca.archive.ubuntu.com/ubuntu/ gutsy-backports main restricted universe multiverse

# deb http://archive.canonical.com/ubuntu gutsy partner
# deb-src http://archive.canonical.com/ubuntu gutsy partner

deb http://security.ubuntu.com/ubuntu gutsy-security main restricted
deb-src http://security.ubuntu.com/ubuntu gutsy-security main restricted
deb http://security.ubuntu.com/ubuntu gutsy-security universe
deb-src http://security.ubuntu.com/ubuntu gutsy-security universe
deb http://security.ubuntu.com/ubuntu gutsy-security multiverse
deb-src http://security.ubuntu.com/ubuntu gutsy-security multiverse
And, of course, follow up with apt-get update
bash# apt-get update
    ... deletia ...
If you have never run your own server, then I suggest you start with tiny httpd because it is VERY easy to configure.
root@myserver:~# apt-get install thttpd
Reading package lists... Done
Building dependency tree
Reading state information... Done
Suggested packages:
  thttpd-util
The following NEW packages will be installed:
  thttpd
0 upgraded, 1 newly installed, 0 to remove and 27 not upgraded.
Need to get 0B/54.4kB of archives.
After unpacking 217kB of additional disk space will be used.
Selecting previously deselected package thttpd.
(Reading database ... 15289 files and directories currently installed.)
Unpacking thttpd (from .../thttpd_2.23beta1-7_i386.deb) ...
Setting up thttpd (2.23beta1-7) ...
Starting thttpd: web server.
Notice that it already started the web server. If you look in /etc/rc2.d you will find a link to start the thttpd daemon every time you boot the server.
Now here's what I really like about the thttpd daemon: it's config file. Here is the config file:
root@myserver:~# cat /etc/thttpd/thttpd.conf
# /etc/thttpd/thttpd.conf

# Port: portnum
# Sets the port number which will be listened by thttpd.
# Default: 80
port=80

# chroot/nochroot
# Sets whether thttpd will chroot after starting.
# Default: nochroot
chroot

# user: userid
# Specified which user to switch after intialiazation when started as root.
# Default: www-data
user=www-data

# host: hostname
# Specifies a hostname to bind to.
# Default: Bind to all supported hostnames on the local machine.
# host=grugler

# Logfile: logfile path
# Specifies a file for logging.
# Default: Log via syslog()
logfile=/var/log/thttpd.log

# throttles: file
# Specifies a file of throttle settings.
# Default: /etc/thttpd/throttle.conf
throttles=/etc/thttpd/throttle.conf

# urlpat: pattern
# Specifies which URL can only be only be accessed from the local server.
# Default: None
# urlpat=*.mpeg|*.mp3|*.wav|*.gz|*.jpg|*.gif

# dir: directory
# Specifies a directory to chdir() to after thttpd starts.
# This directory will most likely be the directory you will be serving your
# clients from.
# Default: `cwd`
dir=/var/www

# cgipat: pattern
# Specifies which URL may contain executable CGI files.
# Default: None
cgipat=/cgi-bin/*
That's the entire config file! And it is very easy to read and understand (unlike some OTHER popular http daemons). Notice that you can change the port – that is handy if you want to run a semi-private server on an obscure port. Also note that the html files are stored in /var/www
Check the local IP address of your server:
root@myserver:~# ifconfig eth0
eth0      Link encap:Ethernet  HWaddr 00:05:5D:07:B9:6D
          inet addr:192.168.0.107  Bcast:192.168.0.255  Mask:255.255.255.0
          inet6 addr: fe80::205:5dff:fe07:b96d/64 Scope:Link
          UP BROADCAST RUNNING MULTICAST  MTU:1500  Metric:1
          RX packets:2323 errors:0 dropped:0 overruns:0 frame:0
          TX packets:645 errors:0 dropped:0 overruns:0 carrier:642
          collisions:0 txqueuelen:1000
          RX bytes:212368 (207.3 KB)  TX bytes:119491 (116.6 KB)
          Interrupt:11 Base address:0xec00
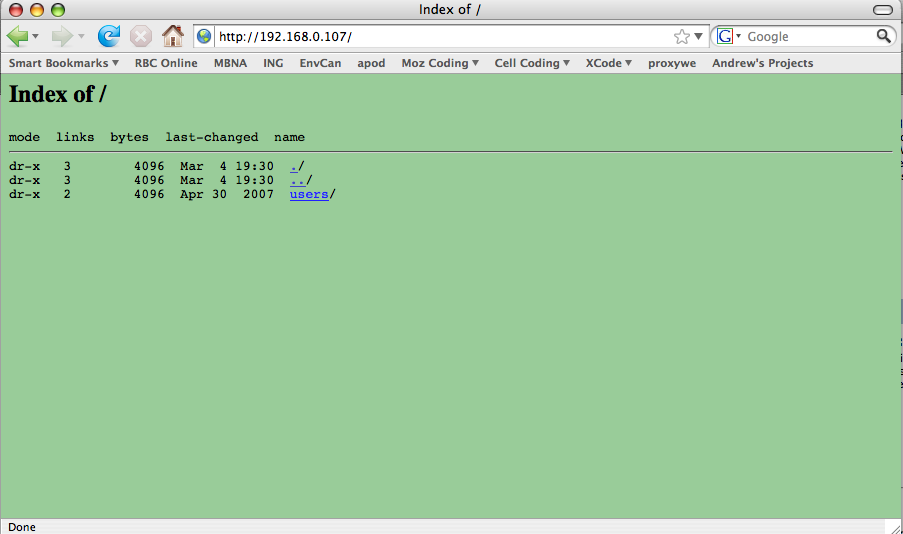
My server's local IP address is 192.168.0.107. I will assume that you have another workstation running on your local network. Go to your workstation and aim the browser at http://192.168.0.107. You should see something like this:
The browser shows the contents of the http daemon's document root directory (/var/www) because there is no index.html file:
root@myserver:~# ls -lah /var/www
total 12K
drwxr-xr-x  3 root root 4.0K 2008-03-04 14:30 .
drwxr-xr-x 14 root root 4.0K 2008-03-04 14:30 ..
drwxr-xr-x  2 root root 4.0K 2007-04-30 15:16 users
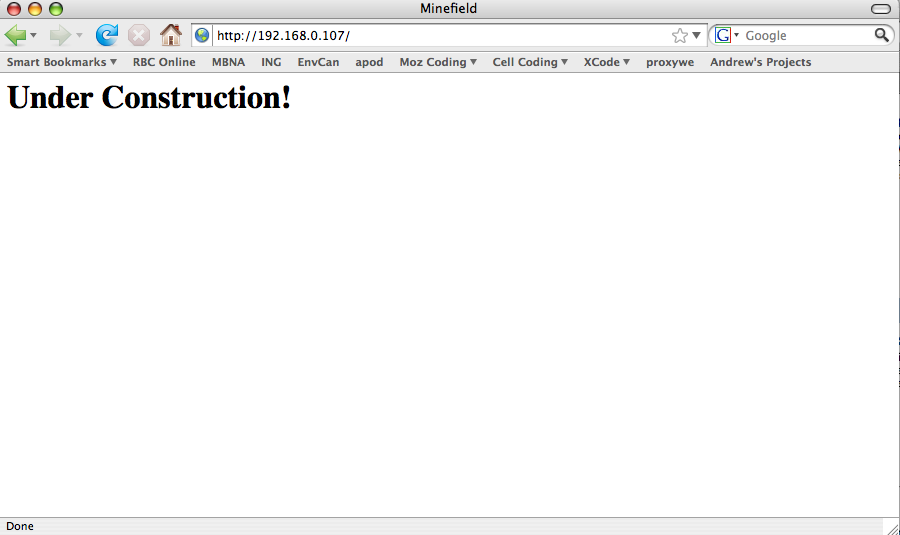
So let's create a really simple index.html file. If you haven't already changed to root, do it now, then hange directory to /var/www and start vi:
owner@myserver:~$ sudo -i
[sudo] password for owner:
root@myserver:/var/www# cd
root@myserver:~# cd /var/www
root@myserver:/var/www# vi index.html
Enter and save the following text:
<html>
<h1>Under Construction!</h1>
</html>
Now go back to your workstation and hit the refresh button on your browser. You should see something like this:
Hooray! Your webserver is live! But you can only see it on the local network. The next step is to open it up to the internet
Each router has a different management interface, but they all implement the same basic idea: any request to access port 80 on the router will be forwarded to the IP address of your server. This only makes sense if your server has a static IP address, so you should edit your /etc/network/interfaces file. First type the command
root@myserver:/etc/network# man interfaces
This will show you the manual page for your interfaces file. Which is very complicated. Fortunately what we want to do is very simple: here is an example of my interfaces file:
root@myserver:/etc/network# cat interfaces
# This file describes the network interfaces available on your system
# and how to activate them. For more information, see interfaces(5).

# The loopback network interface
auto lo
iface lo inet loopback

# The primary network interface
auto eth0
iface eth0 inet static
   address 192.168.0.107
   netmask 255.255.255.0
It is a good idea to avoid IP address conflicts by selecting a static IP address which is outside the range used by the router's dhcp server.
Now we can set up port forwarding. My router is a Linksys WRT54GL running OpenWRT. Here's a screenshot of my port forwarding setup:
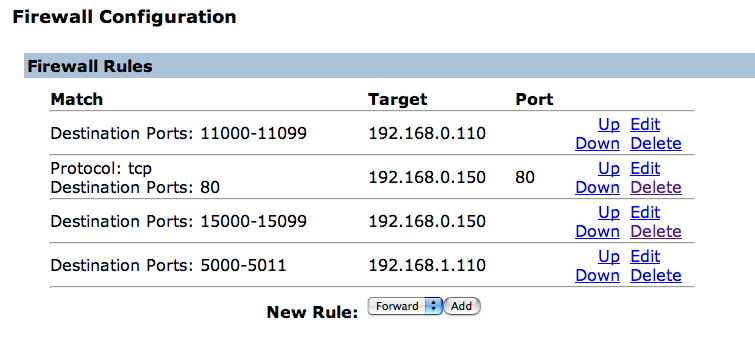
In my example I am forwarding port 80 to a server which has the static IP address 192.168.0.150.
Now you need to know your external IP address. This is the IP address that the rest of the world sees when it talks to your router. Go to your workstation and aim the browser at http://www.whatismyip.org. You should see something like this:
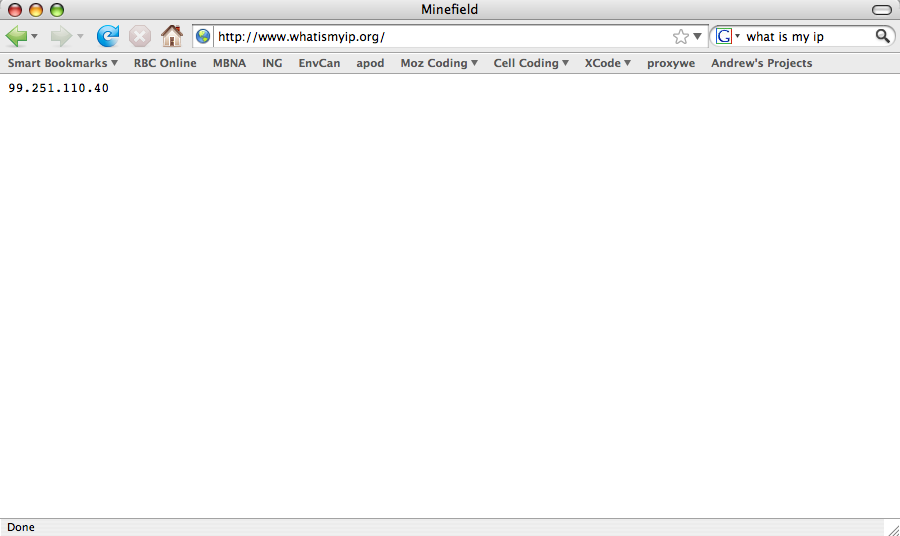
My external IP address is 99.251.110.40. So now, if I went to another person's house, or a public library, and typed in the URL http://99.251.110.40 then I would see my Under Construction web page. But here's a short cut. Instead of going to someone else's house, aim your web browser at http://www.proxyweb.net then enter http://99.251.110.40 (substitute your own IP address of course!) and you should see what your web page looks like to the outside world.
No one likes to enter IP addresses in the URL. Most people prefer names to numbers. Also, if you are behind a DSL or cable modem then your IP address could change. Names are handy because you can publish your web page's name and just change the mapping between your IP address and name. So you need to purchase a domain name and pay for dynamic DNS service. There are many companies that provide this service. godaddy.com is probably the cheapest, but it doesn't support canadian .ca domain names. So I use easydns.com – it supports canadian TLD (top level domain) and is reasonably priced. Another place to consider is domainsatcost.ca, but as far as I know they don't provide dynamic DNS.
Here is a screenshot of the management pane of easydns.com.
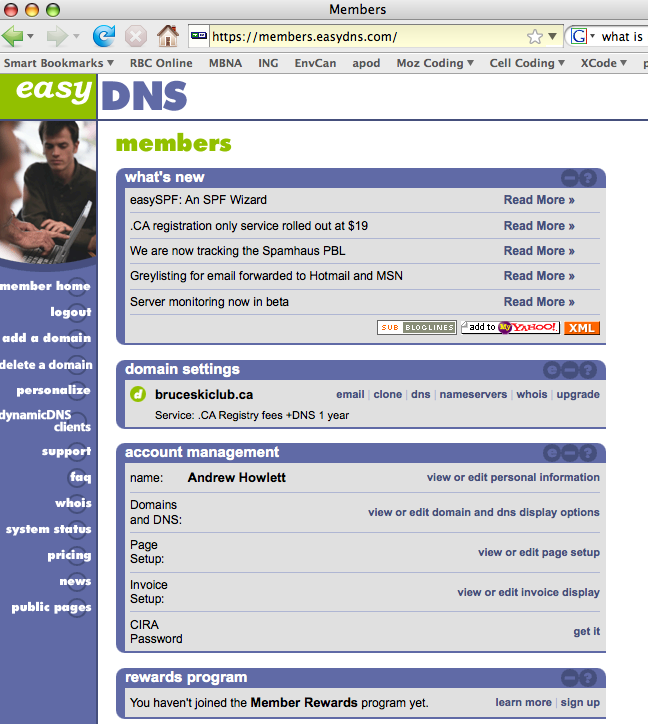
It is pretty complicated. The important thing is the domain
settings line. This example is for my bruceskiclub.ca website.
Now click on the dns button to the right of the bruceskiclub.ca
entry. The dns settings pane will appear. Scroll down to the
hosts section, as shown in this screenshot:
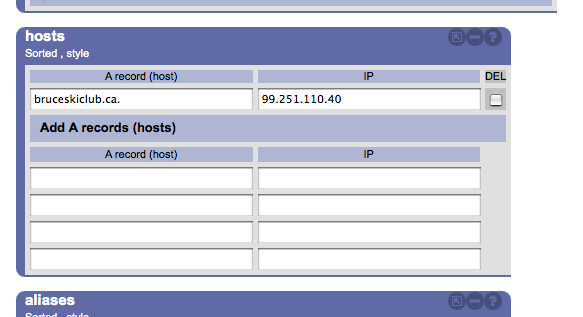
This is where the DNS remembers what IP address belongs to this domain name. I also like to make an alias, because some people like to type in www.bruceskiclub.ca, while others prefer just bruceskiclub.ca. I can create the alias in the alias section:
When all the changes are made, click on the next button at the bottom of the page. Review the changes on the summary page. If you are happy with the changes click the done button. It takes about fifteen minutes for the changes to become effective. Then the world can see your webpage at your own domain name!
Now the problem is that your ISP might change your external IP address. When that happens you must change your easydns configuration. Sound hard? No problem! There's a handy little linux utility called ddclient (dynamic DNS client) which will do the work automatically. First install ddclient:
root@myserver:/etc/network# apt-get install ddclient
A dpkg config screen will appear asking which dns service you are using. Answer the questions as accurately as you can. If you don't know the answers just put anything in and you can edit the config file manually with a text editor.
We want to run ddclient as a daemon, so we must edit the /etc/defaults/ddclient file and set run_daemon to true:
root@myserver:/etc/network# cat /etc/default/ddclient
# Configuration for ddclient scripts
# generated from debconf on Tue Mar  4 15:32:10 EST 2008
#
# /etc/default/ddclient

# Set to "true" if ddclient should be run every time a new ppp connection is
# established. This might be useful, if you are using dial-on-demand
run_ipup="true"

# Set to "true" if ddclient should run in daemon mode
run_daemon="true"

# Set the time interval between the updates of the dynamic DNS name in seconds.
# This option only takes effect if the ddclient runs in daemon mode.
daemon_interval="300"
Also, note that the daemon interval is set to 300 seconds (5 minutes). That means that the ddclient process will check your IP address every five minutes and fix any changes that might have occured. Here's my /etc/ddclient.conf file. Yours might be different - seek help on the internet if you have trouble figuring out your exact config.
root@radagast:/etc# cat ddclient.conf
daemon=300                              # check every 300 seconds
syslog=yes                              # log update msgs to syslog
mail=root                               # mail all msgs to root
mail-failure=root                       # mail failed update msgs to root
pid=/var/run/ddclient.pid               # record PID in file.
## To obtain an IP address from Web status page (using the proxy if defined)
use=web, web=checkip.dyndns.org/, web-skip='IP Address' # found after IP Address
#
#use=ip,                     ip=127.0.0.1       # via static IP's
#use=if,                     if=eth0            # via interfaces
use=web                                 # via web
#

##
## EasyDNS (easydns.com)
##
server=members.easydns.com,             \
protocol=easydns,                       \
login=andrew_howlett,           \
password=notmypassword      \
bruceskiclub.ca
Notice that you must include your account name and password in the ddclient.conf file. That makes me a bit nervous. Changing the file's permissions so that only root can read the file makes me feel better:
root@radagast:/etc# chmod 600 ddclient.conf
root@radagast:/etc# ls -lah ddclient.conf
-rw------- 1 root root 677 2008-03-04 15:33 ddclient.conf
Your server is up and running and the world can see it. But all they see is an Under Construction sign. You need to upload some content to your server. I would suggest installing the openssh-client and openssh-server packages so you can secure copy content from your workstation. In Part 2 we will set up rsync ...